Wednesday, June 3, 2009

Don't do that with SharePoint by Paul Galvin


We've all had flashbacks to our childhood when our mothers told us, "Don't do that, or you'll regret it." But then we went ahead and did it anyway, right? As children, we just didn't have the wisdom or foresight to trust that advice. Now that we're older and wiser, we can take those words to heart.
Here are five "don't do that" tips for SharePoint that can save you hours of unnecessary re-work down the road. Not interested in following this advice? That's your decision, but don't say I didn't warn you.
NUMBER 1: Don't change the title on the core item content type.
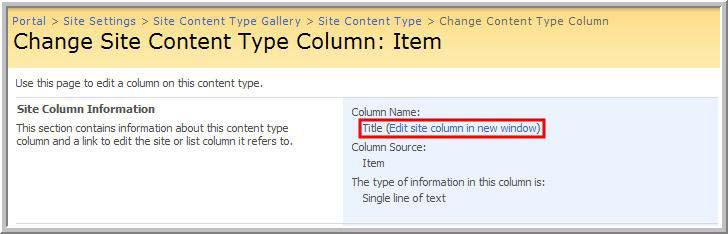
SharePoint has a Title column on every custom list (FIGURE 1), and it's used throughout the environment. If you rename the Title to something like "organization," you will have the undesired consequence of changing it in more places than you had planned.
FIGURE 1 (click to enlarge)
The problem will show itself very quickly—you'll probably receive phone calls from confused end users within the hour. It is difficult to fix and cannot be done out of the box. Share- Point recognizes the word Title, along with a number of other names, as being special. It will not let you create a column with that name, but itwill let you change the existing core column.
So you can rename the core Title column onMonday. But, when you realize your mistake on Tuesday, SharePoint won't let you fix the problem by setting the core column's name back to "Title" because "Title" is a reserved word. In other words, SharePoint allows you to enter a catch-22 situation and won't easily let you out.
The solution is to use a third-party tool, such as one you'd find on Code- Plex, or to write some C# orVB.NET code and make the correction programmatically. The easiest thing, though, is to save yourself the trouble by never changing the Title column's name.
NUMBER 2: Beware of "publishing site" templates.
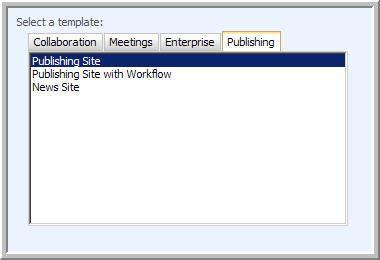
If you create a site based on a publishing site template, you cannot save that site as a template (FIGURE 2).
FIGURE 2
More than one SharePoint pro has set out to create the perfect custom template. They do everything the right way: They interview the users and work with them over a period of a week or two to design the ideal custom template. But when they create the site to use as a template, they hit a snag.
Here's the problem: Everything looks perfect, but then you go to save your site as a template so you can reuse it, and can't do it.
FIGURE 3A shows the look-and-feel options for a site based on a publishing template, and FIGURE 3B shows a site based on a collaboration template.
FIGURE 3A 
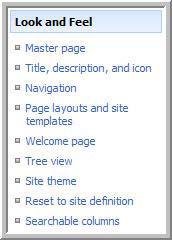
FIGURE 3B (click to enlarge)
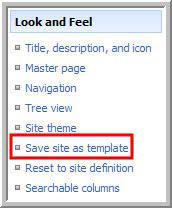
If you've done this to yourself, your best bet is to start over with a collaboration template. Consider using a blank template or possibly a team site template as your starting point. If you want or need publishing features in your custom template, enable them on your site, as shown in FIGURE 4.
FIGURE 4 (click to enlarge)
NUMBER 3: Don't define content types in the wrong place.
Content types fit within the site hierarchy of your sites. Consider the following hierarchy:
Portal
    SubSite A
       SubSite AA
          SubSite AAA

    SubSite B
       SubSite BB

    SubSite C
       SubSite CC
          SubSite CCC
If you define a site content type at "SubSite C," it will be available to Sub- Site CC and SubSite CCC. But it will not be available to SubSite A, SubSite B or their children. There is no easy way to move a Site Content Type around in the hierarchy. If you make this mistake, your only alternative is to delete the Content Type and recreate it at the right position in the hierarchy.
Deleting a content type can be drastic and—very possibly—impossible as a practical matter. Once content such as documents orWeb pages use a Content Type, you cannot delete it. The most important lesson to draw here is that a well-thoughtout information architecture is vital for a healthy SharePoint environment.
NUMBER 4: Don't expect to rescue SharePoint Designer workflows.
SharePoint Designer is a friendly wizard that allows properly trained business analysts to create workflows. Companies leverage these workflows to solve a wide variety of business problems. But, a SharePoint Designer workflow has a major technical limitation that escapes the notice of many first-time SharePoint users: It is always tied to a specific list.
Many times, organizations define multi-step workflows that solve business problems common to multiple teams and divisions within a company. Wouldn't it be great if you could design and implement a workflow in one list and then just drag and drop the workflow to another list in the environment? It might be, but you're out of luck.
There are some highly technical methods to get around the reuse problem. But, the time required to create a technical solution is just not worth it.
NUMBER 5: Workflow history is not an audit trail.
This is an insidious issue because you would never notice the problem until it's far too late. For example, an auditor is tapping you on the shoulder, asking you to demonstrate when a particular financial document was approved and by whom. You go to the workflow history and it's empty. Why? By default, SharePoint purges workflow history after 60 days.
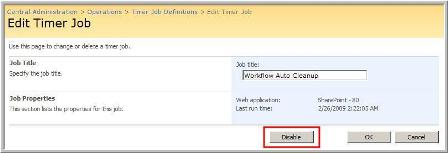
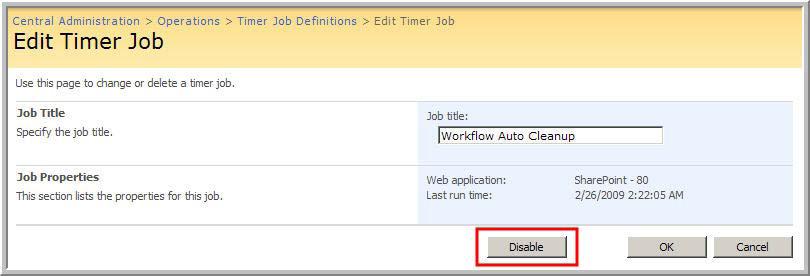
There are several ways to address this problem: You can disable the job that does the purging (FIGURE 5). You can change the purge interval using the stsadm command line program. Or you can write your own audit mechanism. SharePoint Designer can write critical auditable events to a custom list.
FIGURE 5 (click to enlarge)
The best choice is to leverage builtin auditing, possibly with a third-party tool that specializes in audit reporting in a SharePoint environment.
So there you have it. Now you know what not to do.
Some of these SharePoint pitfalls are relatively easy to overcome, such as picking a publishing template as a base for your own custom templates. Others are not.
And for those, you may have to start over. Use these tips to avoid these traps, and you'll have a more stable and productive experience with SharePoint.
Paul Galvin is a Microsoft SharePoint MVP and a SharePoint solutions architect at EMC Corp. Galvin has worked in the IT industry for more than 15 years in such areas as software development, consulting and SharePoint solutions design, where he works with clients to create business solutions using the SharePoint platform. He contributes to the SharePoint community through MSDN forums and his blog at http://paulgalvin.spaces.live.com.


Monday, June 1, 2009

Study recommendations for Sharepoint Exam (70-542)


Paul Galvin has prepared a nice list of links which is quite useful in preparing for Sharepoint certification exam (70-542 Microsoft Office SharePoint Server 2007 - Application Development).


http://paulgalvin.spaces.live.com/blog/cns!1CC1EDB3DAA9B8AA!192.entry

Tuesday, May 26, 2009

Working With the ANTS Profiler to Optimize SharePoint by Shereen Qumsieh


Background

Before I get into any detail about this particular problem and its eventual resolution, it might be helpful to provide a little background information about why we're doing this and how we got here. 
Windows SharePoint Services 3.0 (WSS 3.0) provides a very extensible solution platform for the professional Microsoft .NET developer and is becoming increasingly more popular among companies looking to build collaboration and workflow into their environment.
I have been working on a project for the past couple of weeks that consists of a Windows SharePoint Services 3.0 small server infrastructure and several custom application pages written in ASP.NET C# via the SharePoint Object Model. 
The focus of this post will be a small subset of what has been built to date. We'll call this piece the Master Data List. This Master Data List was created as a standard Custom List in SharePoint with several new columns created for the purposes of collecting data relevant to active projects for this department. It was decided early on that the standard newform.aspxeditform.aspx and dispform.aspx pages that come by default with the instantiation of a new list were not going to be sufficient for the purposes of this list. There were several reasons for this:

  • We wanted to dramatically change the layout of the page, including background colors on specific sections, fonts, hyperlinks etc.

  • We wanted complete controls over the types of validation we were doing

  • The page itself was to consist of some aggregated data, in the form of drop downs and data grids, that was being pulled from several different lists within the same site and presented on the editform.aspxand dispform.aspx pages

Problem

Because of the complexity of these pages and the amount of aggregation we were doing, the average loading time for the edit and display forms was about 30 seconds (give or take a few seconds). The objective of this performance evaluation was to bring down the total time for page load to less than 10 seconds which would be a more reasonable end user experience.

Solution

I did manage to eventually bring down the loading times to under 10 seconds, so a 70% increase in performance, with several different techniques which I will now discuss in some detail.
  1. The first thing I did for both the editform.aspx page and the dispform.aspx page was to remove all <asp:Label> objects and replace them with plain text. If I wasn't planning to manipulate the label object in any way in the code behind, there was no need to create a control of this type. Text was sufficient for these purposes.
  2. The second thing I did was to remove all Telerik textbox and combobox controls except where required and converted them to asp:dropdownlists and asp:textboxes.
  3. The third thing I did and the focus of this article was to leverage ANTS Profiler to find areas in my code that required optimizing. I am going to talk about this in some detail to outline my approach to doing this and how this helped with the performance tuning.

Configuring ANTS Profiler to work with SharePoint

To get started, you'll need to have some sort of development box already in place where your code has been deployed to. In my specific example, I had WSS 3.0 installed in a single server scenario, with all of my custom application pages stored in the _layouts directory.
Download and install the ANTS Profiler from here. They offer a free 14-day trial that will be enough to get you going. I really do recommend that any serious SharePoint developer or .NET developer have this tool in their tool belt.
Once the profiler is installed, RedGate has provided us with a really handy guide for setting up SharePoint to work with the profiler: http://www.red-gate.com/support/Knowledgebase/ANTS_Profiler/AP4SharePoint.pdf
I won't say much more on the installation steps for ANTS Profiler as they're pretty straight forward.
Once everything has been installed and configured, you can launch the ANTS Profiler. The following is a screenshot of what my profiler page looks like initially:
The above configuration was copied directly from the pdf I'd mentioned above. 
If you're comfortable with the settings, click on Start Profiling to get this going. If you encounter an error similar to the screen shot below, make sure the web site on the port you're trying to profile is stopped. ANTS Profiler needs to be able to launch the site on its own, so you can't have it running while attempting to do this. I run into this now and again when I forget to do that.

Working with ANTS Profiler to track down problem areas

Once the profiler has finished loading, you should now have a default window open to the root of your SharePoint web site.
After this page successfully loads, you'll notice that the profiler has already started gathering data on the initial page load of the SharePoint site. What you'll want to do next is navigate to page you're attempting to optimize. In my example, I type the following:
Hit enter, and the profiler will begin to do its job. Typically I wait for my page to load successfully and then I stop the profiler and begin to do the work of analyzing the results.
As you can see in my screenshot above, I have highlighted the region in the profiler that I want to analyze. If you pay attention when your page loads, you'll get a general idea of where you want to highlight in the time window. Looking at my page above, I can see immediately where the HOT regions are. These are the places I need to pay particular attention to immediately.
To show the source code, I click on the method I'm interested in. In my example, since the slowdown was primarily on Page_Load, that's what I want to drill down into. If I click on theASP._layouts_motorola_not_optimized_aspx.Page_Load method, my screen will refresh with a code view of my page:
The really neat thing about the ANTS Profiler is the way that the scroll bar on the right highlights in RED my problem areas so that I can jump to that part of the code quickly. One of the pieces I was able to optimize was myPopulateDropDownLists method that I had written. Using the profiler I noticed the following bit of code was taking over a second to load:
It would appear that the getDDLNames method, another method I had written, was taking a bit longer than it should to run. Further investigation showed that the reason for this came down to calls to theSPSecurity.RunWithElevatedPrivileges method taking on Page_Load 1.5 seconds to run. Since the SPSecurity.RunWithElevatedPrivileges method is a part of the SharePoint Object Model and not something I had written, I really couldn't optimize that method, I had to come up with a better way to limit the affect it had on my performance.
Within the PopulateDropDownLists method, I was populating a total of 8 drop down controls, each making a call do the getDDLNames method. This was resulting in a huge performance hit simply due to the number of times I was calling SPSecurity.RunWithElevatedPrivileges. I was able to improve the performance of this page by eliminating the getDDLNames method entirely and moving the elevation code up to thePopulateDropDownLists method and making a single call for all 8 drop down lists. As you can see, working with a tool like this makes it really easy to see into areas of your code that you might not have otherwise suspected for the slow down.
I also spent a bit of time going through other areas of my code where this elevation call was being made too many times. I consolidated all areas that required elevation into a single elevation block.
I used the profiler in other areas to optimize code that was not dry enough, and to remove methods that could be architected in better ways. I found that by going through the profiler results and comparing to the code optimization practices found in this document: http://msdn.microsoft.com/en-us/library/bb687949.aspx. I was able to find several areas that needed optimizing.
Take a look at the example below:
SPFieldUserValue user = new SPFieldUserValue(web,Convert.ToString(listItem["Employee"]));
            peEmployee.CommaSeparatedAccounts = pmaUser.LookupValue;
If we have a SPFieldUserValue object, calling upon the LookupValue property will return the Name of that user. This is not to be confused with the LoginName property. Assigning that to the CommaSeparatedAccounts property may do the trick and will load that user account into the control but not without a performance hit.
A better approach would be:
SPFieldUserValue user = new SPFieldUserValue(web,Convert.ToString(listItem["Employee"]));
peEmployee.CommaSeparatedAccounts = pmaUser.User.LoginName;
The difference is minor. Instead of using the LookupValue property, we leverage the SPUser object and call upon the LoginName property. In all of my testing, I noticed an improvement in speed when using the LoginNameproperty.
Depending on your environment, the output from either of those properties will differ and that's the heart of the performance issues. In my environment, LoginName and Name outputted the following:
Name - "Joe User"
LoginName - "domain\juser"

Results/Conclusion

Using a combination of all the techniques I've described above, I was able to dramatically reduce the load time of this page and increase performance to the point where users are happy. Going forward, I was able to gain valuable insights into what aspects of the object model take time to load and therefore require careful planning before implementation.
Original Post on Simple-Talk.com 

Tuesday, May 19, 2009

Add Google Analytics to a SharePoint Publishing Site


From weblog of MIKE KNOWLES
Google Analytics is a web traffic and demographics reporting service provided free of charge by Google. Google Analytics functionality can be added to any web site by setting up an account and adding a snippet of JavaScript to every page within the web site. Once configured you can see all types of statistics such as how users were referred to your site, number of hits per page, where your users are located geographically, what types of browsers and OS they are using, and much more.
This post outlines how to add Google Analytics to a SharePoint Publishing site. You must have edit rights for all site Master Pages. Google Analytics can complement the Usage Reports available to Site Collection Administrators and Search Term Reports available to Shared Service Provider Administrators. Analytics can also be used to provide read-only access to users who do not have administrative rights on the SharePoint site but whose job function might benefit from access to detailed site usage data.

Click here to read the rest of the article:
http://mikeknowles.com/blog/2009/05/17/AddGoogleAnalyticsToASharePointPublishingSite.aspx

Sunday, May 17, 2009

All about Sharepoint 2010


All about Sharepoint 2010 from weblog of Vasmi Krishna:


  1. SharePoint 2010 will be 64-bit only.
  2. SharePoint 2010 will require Windows 2008 or Windows 2008 R2
  3. SharePoint 2010 will require 64-bit SQL 2008 or 64-bit SQL 2005
  4. Internet Explorer will not be supported in SharePoint 2010. The Tier 1 browsers will be IE 7, IE 8 and Firefox 3.x on Windows platform

So, what can you do today to get into the best shape for SharePoint Server 2010?
  1. Start by ensuring new hardware is 64-bit.  Deploying 64-bit is our current best practice recommendation for SharePoint 2007.
  2. Deploy Service Pack 2 and take a good look at the SharePoint 2010 Upgrade Checker that's shipped as part of the update.  The Upgrade Checker will scan your SharePoint Server 2007 deployment for many issues that could affect a future upgrade to SharePoint 2010.
  3. Get to know Windows Server 2008 with SharePoint 2007, this post is a great starting point.
  4. Consider your desktop browser strategy if you have large population of Internet Explorer 6 users.
  5. Continue to follow the Best Practices guidance for SharePoint Server 2007.
  6. Keep an eye on this blog for updates and more details in the coming months.

Wednesday, January 14, 2009

Web Site Design and Positioning

During my last workshop class on ASP .NET we had a review on web page design with ASP .NET. One of the most important part of the design is positioning the element inside you web site. What I recommend is to use <div> and <span> element with CSS styles to position your web pages instead of <tables>. If you look at the many professional designed web sites (like yahoo,msn, ...) and check their source code you will be noticed that most of them are using <div> or <span> for their pages. If you want to know why? "Table vs CSS" is are the reasons.


Now let start with learning <div> and CSS positioning. Just like always I recomend W3Schools. The next one is a reall great weblog from Big John, positioniseverything.net. It's nice blog explaining about positioning with CSS and bugs of browsers.